
How to Build and Use a Simple Thermometer: Easy Science Experiment with Printable
While much of elementary science centers around the tangible and observable, other topics aren’t as easy to capture visually. But Sonlight’s Science C: Geology, Meteorology, and Mechanical Technology tackles a wide array of ideas through both literature and hands-on exploration, bringing science to life. This simple temperature experiment below, adapted from Science C’s Usborne Book of Science Experiments, Volume Three, is a fun and satisfying way for kids to create a thermometer and then use it to demonstrate how heat affects the expansion of fluids.
Gather Materials to Create a Simple Thermometer
In an age where LED thermometers are everywhere, “the mercury is rising” might seem an odd way to say “the temperature is going up”. But the phrase, of course, harkens back to the days of mercury and glass thermometers, when the element’s climb up an enclosed glass tube marked an increase in temperature. Today, the use of mercury in thermometers is quite rare, and many non-digital thermometers use a form of alcohol instead.
But the scientific principles behind why a glass tube thermometer works haven’t changed. And we can observe the same idea in action by creating a simple thermometer with rubbing alcohol, a bottle, and a clear straw.
Materials Needed:
- A clear bottle*
- A clear straw
- Rubbing alcohol
- Food dye
- Modeling clay
- Two large bowls
- Ice cubes
- Hot water
*This experiment works best with a sturdy, smooth-sided bottle, rather than a thin ridged one.
Instructions for Building Your Thermometer
1. Pour rubbing alcohol into the clear bottle until it’s about one-third full. This is your indicator liquid.

2. Add several drops of food dye so the indicator liquid will be easily visible.

3. Place a clear (or translucent) straw into the bottle and stir gently to distribute the dye. Hold the straw in place in the center of the bottle, above the inside base of the bottle. (Don’t press the straw to the very bottom, or you’ll accidentally stop the flow of liquid.)

4. Use a generous chunk of modeling clay to seal the bottle opening and secure the straw in place.

Make Predictions About the Behavior of Matter

As soon as you finish closing off the top of the bottle, what happens? Once the clay forms a sufficiently secure seal, the indicator liquid begins to climb up the straw, higher than the level of fluid in the bottle. Interesting, isn’t it? The level in the straw is a reflection of the temperature in the room. (If you want, you can carefully mark this level on the bottle with a permanent marker, and label it.)
While this device doesn’t measure temperature numerically, it does allow us to visually see changes in temperature. We’ve already observed the liquid rise up inside the straw at room temperature—this is a good start. Now, let’s start thinking about what will happen in different environments. Use the free printable lab activity sheet here to record your predictions and observations.
Will the water level go up if we place the thermometer in ice water—or will it go down?
- What about in hot water?
- In a chilly basement?
- Near a sunny window
Using what you already know about energy and matter, stop for a moment to jot down your predictions of what will happen in each experiment location, then begin your tests.
Observe Thermal Thermal Expansion and Contraction in Action
Test the thermometer in a very hot environment. (You can heat water in a tea kettle for this step, but let it cool for a few minutes first. Boiling water might warp or even melt the plastic bottle.) With an adult’s help, pour the hot water into a glass bowl, then carefully place your thermometer into the bowl of hot water. Be sure to hold it in place so it doesn’t turn into a buoy and bob away! What happens to the level in the straw? Jot down your results.

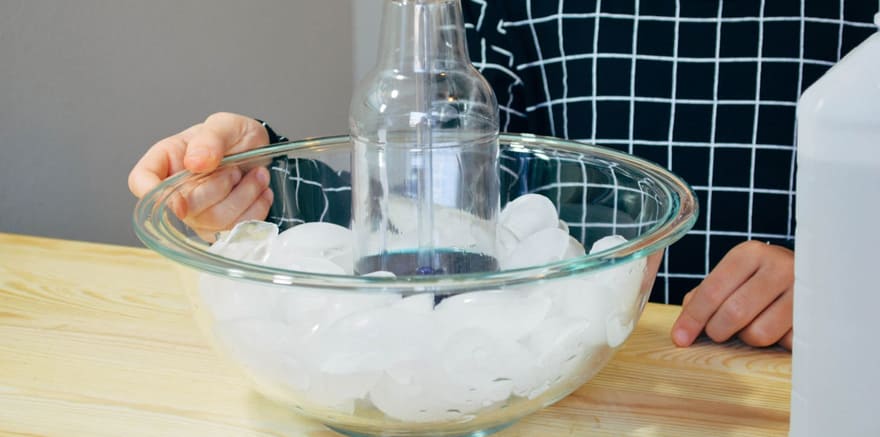
Now fill a glass bowl with ice cubes. Carefully place your thermometer into the cold environment you created. What happens to the liquid level in the straw? Mark the level on the bottle with a permanent marker, then record the result on your lab sheet.
Now it’s time to see what happens to the level in the straw in the various other environments you’ve chosen as test locations. Depending on the spots you’ve chosen, it might take a little while to observe a change. Don’t forget to record your results!

What Scientific Principles Cause a Thermometer to Work?
When you heated up your makeshift thermometer quickly by plunging it into a bowl of hot water, the level in the straw rose rather rapidly, didn’t it? (If your water was very hot, the indicator liquid might even have overflowed the straw!) Why did this happen?
Warm molecules of liquid are much more active than cold molecules. When liquid is heated, the molecules gain energy. This increase in energy causes them to move more—and move further away from each other, too. As the molecules move apart, the overall volume increases.
Although you cannot see individual molecules, of course, you are able to see the volume increase as the liquid level moves up the straw. At room temperature, this is a calm process, since there are usually only subtle variations in temperature. But when the temperature changes quickly—like when you test the thermometer in hot water—the increase in energy and volume is visibly dramatic.
What happens to the molecules in colder environments? You can probably guess, based on your earlier observations. When you place the thermometer into the chilly bowl of ice, the liquid molecules lose energy and slow down. As their motion diminishes, the molecules move back closer together. You see the visible effect of this decrease in energy and volume when you observe the water level in the straw go down.


Thermal expansion and contraction is happening all around us constantly, but we rarely get to observe it. All matter expands when heated—yes, even solids. Did you know bridges are a different length in very hot weather than they are in very cold weather? This is why they’re built with expansion joints to accommodate those differences. (Want to observe another example of thermal contraction? Place a balloon in the fridge!)
Hands-on experiments open up a world of wonder to elementary-aged students, bringing abstract ideas into full focus and bringing invisible concepts into the observable realm. If you like this experiment, get more science activities like it in either Science C full homeschool curriculum or the simpler Explorations in Science kit from Sonlight.


Science Fun with Sonlight

Great Books + Engaging Activities + Hands-On Experiments – Sonlight Science
Sonlight marries the joy of reading with the excitement of hands-on projects to bring you the most complete Science program.
Programs available from kindergarten to college-level lab sciences.
About the Author
Gina Munsey is a Mexico-born, Eastern Europe-raised missionary kid who ended up in Nashville, Tennessee. A blogger for 16+ years, editor, magazine contributor, co-op teacher, and writer who has only completed four chapters of her languishing memoir, Gina spends her days full of coffee and adventures while helping her asynchronous daughter with Chinese homework. You can find Gina at oaxacaborn.com, or in the middle of [home]school surrounded by stacks and stacks of books.